We have covered writing checks, balancing a checkbook, and even budgeting before in previous posts. This time, we are going to go over personal bookkeeping. Why? Because being able to keep your own ledger can help you budget your finances as well as itemize properly on your tax return.
Since this is the technological era where you are most likely reading this post on a screen of some sort, we are going to cover bookkeeping on your computer. But first, a little background.
Around this time last year, I was helping a friend of mine in his bookkeeping business. He had a few clients and I would help him out by doing the ledger in a spreadsheet that I had to make myself. This was quite annoying as I had to make each category myself and then remember where they all were. I decided to look into a few programs to find out what worked best for me and was better than using a spreadsheet. I found a good program that can be used for businesses, but is also flexible enough to be used for personal use as well.
How many people know of Quicken and Quick Books? Probably most people have heard of those programs or have seen the commercials. Those programs – while great tools – cost some money, especially for every year. We will not be talking about those programs.
How many people know of GNU Cash? Not many, I’m sure. GNU Cash is a free and open source bookkeeping program, and the one that I found to help myself and my friend out in his business (to be honest, he kept using Quick Books since he needed more in-depth information for filing taxes for businesses, but for ledger keeping it is great). GNU Cash is great because 1) it is free, 2) it is cross platform – meaning it can be used on Mac, Windows, Linux, and Android (not a full port but enough for bookkeeping on the go), and 3) it is easy to use. Since this is a post about bookkeeping in general, and not a how-to guide for the program, let us focus on the actual process of bookkeeping.
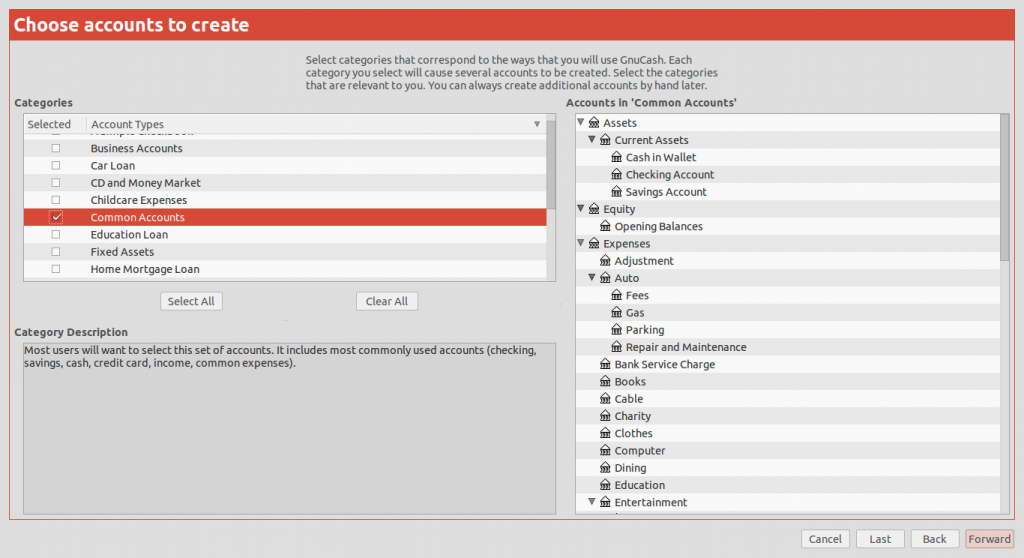
Firstly, there should be some kind of setup wizard like in the picture to the side. This will help you to set up whatever kind of account that you are trying to bookkeep. In the example to the left, we are just using a basic “Common Assets” which is just like a general bank account. If you notice the right side of the picture it has different categories for different things.
I’ll go over some of those other things below. So our first step is just selecting the type of account we want to work with, and then a blank template with different categories.
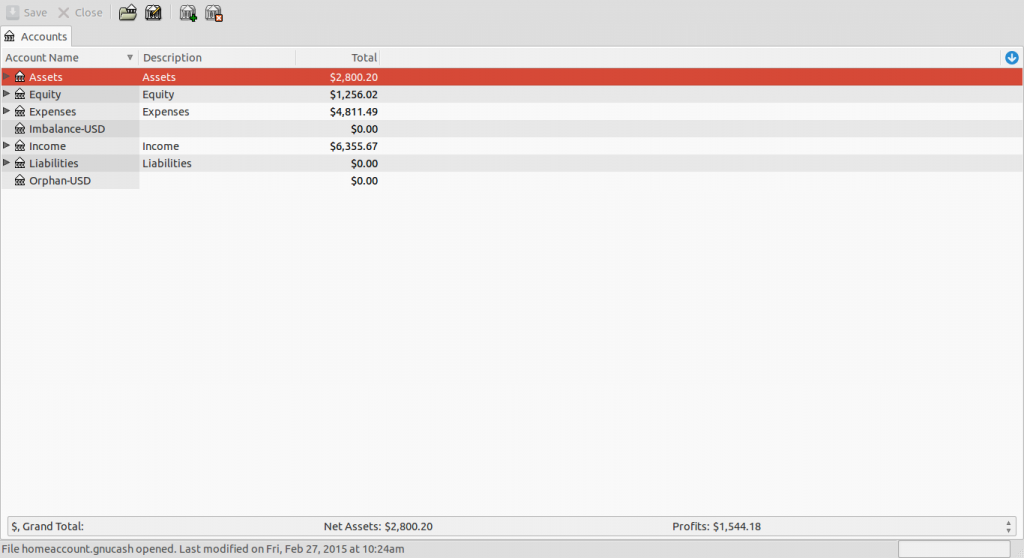
This is what your account will look like with all of the subcategories closed. This is just a sample of what an account will look like after you’ve added information. I know the picture is tiny, but you can click to enlarge it.
The first category is “Assets” which will include the subcategories of “Cash In Wallet,” “Checking Account,” and “Savings Account.” These subcategories are where you add or subtract things to or from the money that you have. For example, say that you got paid from your job – or your great uncle passed away and left you some money – you would notate that in the “Checking Account” category. Another example is that you paid your friend $20 out of your wallet, so you would notate that withdrawal from “Cash In Wallet.”
The next category that we see is “Equity” which for our purposes will be the opening balance that we have. I personally went with the balance that my bank account had on January first, which I think makes sense if we are going from one tax period to another.
After Equity comes “Expenses” and it is in these subcategories that you are going to put down just about anything that you pay money for and affects the “Assets” category.
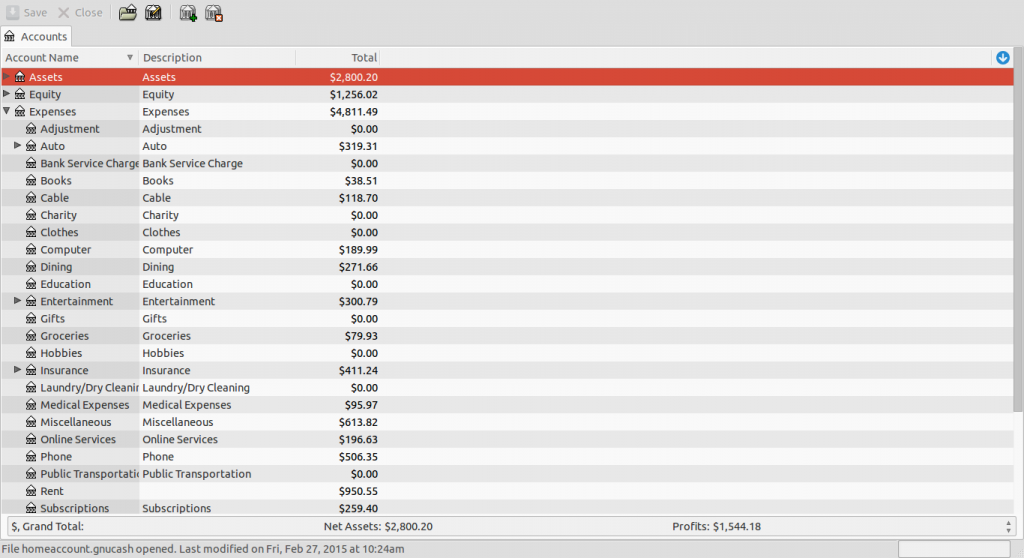
These subcategories include everything from Auto (for your car such as tags, gas, repairs), Bank Service Charges, Charity, Clothing, education, Groceries, Hobbies, Insurance (life, health) Dry Cleaning, Medical Expenses, Phone, Rent, Taxes, and Utilities (phone, electric, gas, water). There are a few different way to get the information needed to put in these subcategories; the first way is to look back over your checkbook registry from when you balance your checkbook (which should include more than just checks written to make sure that it is accurate with your bank), the second way is to look at receipts and add all of that information into the appropriate fields – this is good especially if you are going to itemize your taxes, but not many people keep up with their receipts, the third way is to look at your bank statement either online (if offered) or hardcopy (the piece the bank mails you), the fourth way is a mix of all of those.
I prefer the 3rd way – using my bank statements – since I rarely write checks, and I don’t keep up with my receipts (unless for business). Using your bank statement could be the best option since you are getting the information directly from the bank so there is less of a window for error.
Now then, you may notice in the collapsed picture (second picture) that underneath “Expenses” is a category labeled “Imbalance-USD” this category lets you know when your numbers don’t add up. Perhaps you have too much money being taken out in one place, but not in another. This lets you know that there is an error somewhere that needs to be corrected. Also, being overdraft should not show up in this category. Remember that I said Equity would be our starting balance? Well without that starting balance we would show an imbalance because we would be saying that we have more money than what the program can account for.
The next category is “Income” this is where you actually put all of your income- from your job, to birthday checks, to helping your neighbor move, etc. Anything that adds to your bank account goes here, like the converse of whatever comes out of your assets goes in “Expenses.”
After Income is “Liabilities”. I believe that this is where you would put things like credit card debt, house mortgage, car payments, etc. Anything that can be counted as a liability. I don’t have credit cards (or debt that I am aware of), no mortgage, no car payments, etc. so I have no liability to put in this spot. At least not that I am aware.
Now that I have explained what the categories and subcategories are for, here comes the fun part; putting in all of the information! Please, hold your applause. This picture is what you get when you double click on the “Opening Balances” subcategory under “Equity.” Notice, there is the date being 01/01/2015, then Num (for like checks or transactions), a description so you know what it is (Opening Balance), Transfer which is important (and I’ll explain below), R for reconcile (I believe – does it agree with your bank all of mine say “n” for new, but there is “c” for cleared), Decrease (decrease balance – withdrawal), Increase (adding money), and finally Balance (the new updated balance).
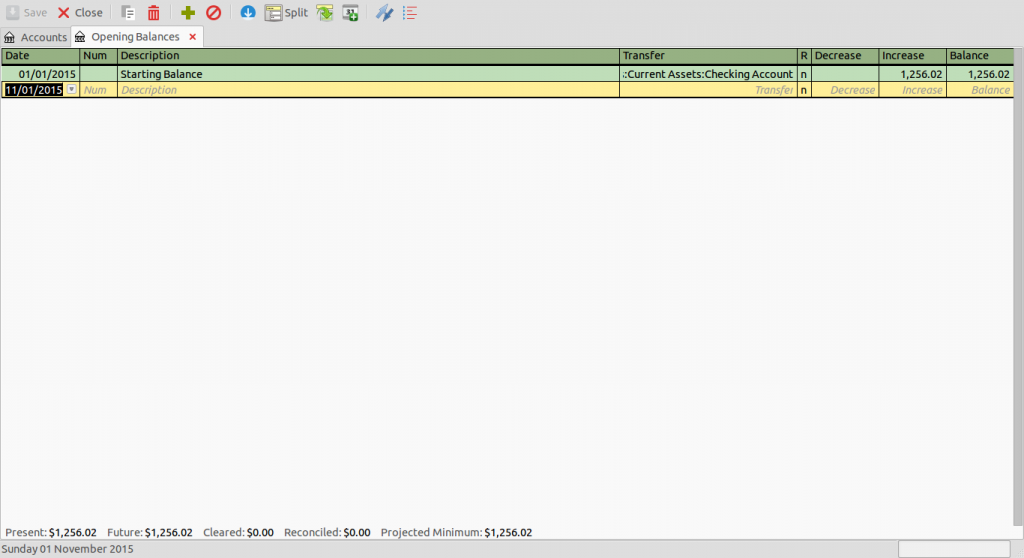
Now, if you look under the section where is says, “Transfer” you will notice that it says, “:Current Assets:Checking Account.” It is very important that there is always something in this field. This ties my opening balance to my checking account. If I didn’t do this there would be an imbalance – money that can not be accounted for. I’ll show you another picture to help give you an idea of what I mean.
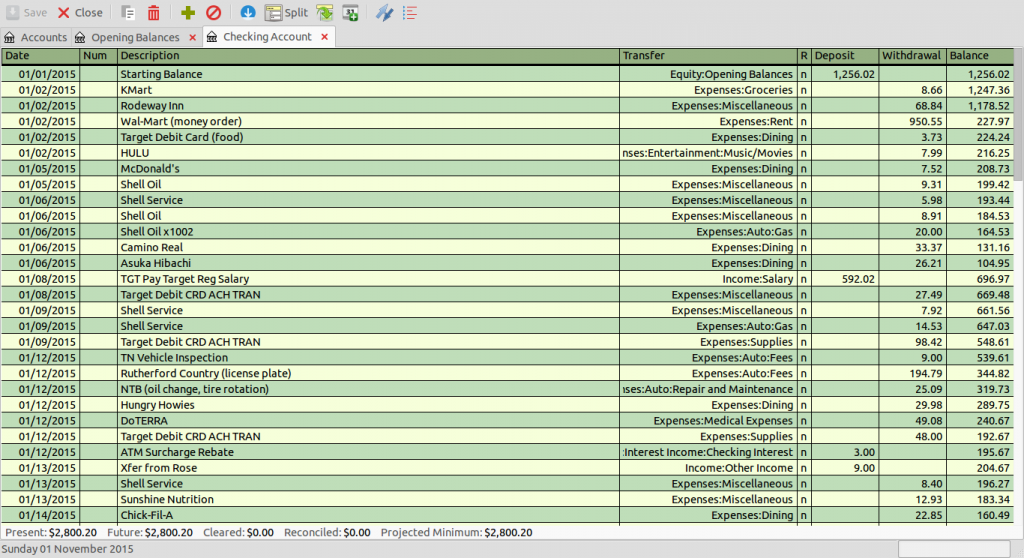
In the above picture, you can see that we are looking into the checking account by noting the highlighted tab. Everything has something in the “Transfer” field. “KMart” transfers to Groceries, “Walmart” transfers to Rent, and “Xfer from Rose” transfers from Income (because my wife transferred me some money). Notice also, since we are looking at the checking account that there are “Deposit” and “Withdrawal” fields. Obviously what is deposited into the account goes in Deposit, whilst what comes out goes in Withdrawal. Also, the balance keeps track right along.
You may have noticed that in the “R” field in the two pictures above that they are all filled in with “n.” That is because I just made these pictures to illustrate what it would look like if we had used the program. In a real world example, the R stands for reconcile, meaning does your bank also say that this amount is correct. Using the “n” signifies that this is a new transaction and has not “cleared” my bank account yet. Using only my bank statements like I usually do, all of my transactions would be marked “c” for cleared.
Let’s talk about reconciliation – or just “n” and “c” for a bit. Keeping books is a great way to budget yourself. You can get a clear and concise image of what your expenses are every month, and you’ll know – generally – about how much you’ll have left. One way to budget more effectively is by using the reconciliation field for when you write a check or use your debit card; you can see what your balance actually is before your expenses clear your bank. So weekly, if not daily, you need to make sure that you are noting any “new” expenses (or incomes if by check since those can take days to clear as well). This way you can make sure that you are not spending too much and have enough left over for emergencies and other things. This is also a better way of tracking your finances than using your bank’s mobile app/online option and your checkbook registry since you are basically combining the 2 with up-to-date information.
I know that this has been a long post, but I hope you realize from it that you can take control of your finances and your budget. I, of course, understand issues when you have too many expenses (emergency medical bills, a leaky bathtub, child support, etc) and not enough income. No amount of number crunching can magically make money appear when there is none. But using a free option like GNU Cash there is no reason why you can’t at least understand better where it is that your money is going so you can start getting a better budget in place.


